Labs on Basic Internet Programming, spring 2010
General info
- I have a new server for the course. Please try it and, if it works OK, use it.
The server URL is "http://gruint10.csc.kth.se"
I have tried it and it works OK for me. It has however some specific (and odd) features.
You put everything in your "public_html" folder.
Access your files through "http://gruint10.csc.kth.se/~username/file"
where username is your normal username, in my case presenting the file "form.html" would be
"http://gruint10.csc.kth.se/~serafim/form.html"
Files ending with ".html" work as usual
Files ending with ".cgi" will be treated as cgi scripts
The content of files ending with ".cgi" may be anything that normally works
as cgi scripts, Perl, shell script, ... but NOT php.
Test e.g. "http://gruint10.csc.kth.se/~serafim/gruint10/itworks.cgi"
and "http://gruint10.csc.kth.se/~serafim/gruint10/perltest.cgi"
and "http://gruint10.csc.kth.se/~serafim/gruint10/javatest.cgi"
and have a look at the files in "~serafim/public_html/gruint10/"
when logged in to a CSC computer.
The server uses java 1.5.0 so "module rm jdk"
followed by a "module add jdk/1.5.0" is a good idea.
If you do something bad the server gives you an internal server error.
The files are also accessible as a zip archive directly on the URL
"http://gruint10.csc.kth.se/~serafim/gruint10/tests.zip"
- We will use the "Sima Manager"
for the lab help & review queue.
Give the command "module add sima" in a terminal window
Then the command "sm &"
You will get a window on the screen
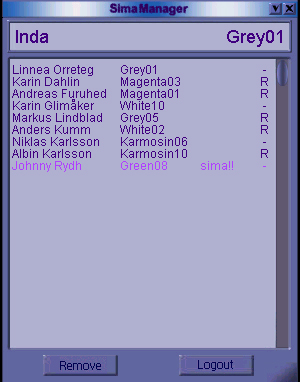
Choose the queue named "gruint" and click the "Login" button
To enter yourself into the queue, click the "Queue" button
To remove yourself from the queue, click the "Remove" button or the "Logout" button
- There are no deadlines for the labs. The only deadline on the course
is that labs must be presented and approved prior to presenting you project.
- Labs may be shown for approval to the course responsible or the
course assistants but not for general lab supervisors unless
auhorised by the course responsible. After march 5th contact
Serafim<, Musard and Siavash.
- Unless you work on your own computer, get familiar with
Solaris
- You can use
KTelnet
to log in from home on any lab machine. Login on any machine,
no matter on which you worked in the lab. Then you will be able
to use the machine as if you opened a terminal. It is good
practice to run the command kauth just after you
logged in. You may experience some problems using Backspace
in emacs over KTelnet. Instead of pressing Backspace, use
Ctrl-h or move to the left with the <- arrow and then press
Ctrl-d to delete to the right instead of deleting to the left.
- If you work on Windows and need a good text editor for programming,
you can try emacs. Refer to this little
emacs crash-course.
- You allways need an internet browser
- You need a Java virtual machine and compiler (provided on Solaris,
download it on Windows).
- The version of Java that you get automatically when logging in to the Unix systems
is far more complex than needed for these labs. If you want an older (simpler) version,
then use the command
module add jdk/1.4.2
and everything should work accordingly
- Specifically, if you fail to get things working and you get
"funny" or strange error messages, try different versions
of Java by removing the present java module with
module rm jdk
and testing with versions 1.4.2, 1.5.0 or 1.6.0 by
module add jdk/1.4.2,
module add jdk/1.5.0 or
module add jdk/1.6.0
To the top of the page »
Lab 1
HTML and Java
You may work in groups of at most 3 persons, preferably 2.
Task 1
- To get familiar with HTML in
case you are not and to learn
how to publish pages at CSC
Make a simple HTML page that should contain the elements below.
See some HTML documentation and the HTML standard.
Use a text editor (not a graphic HTML editor) to edit it (pico or emacs
on Mac OS). You can test your page by loading it in a web browser using
File/Open
- a bold, an italic, an underlined text
(<b>, <i>, <u>)
- a heading1 and a heading2 title (<h1>, <h2>)
- a link to another page (<a href> )
- a link to a place in the page (<a href> , <a name> )
- a table (<table>, <tr>, <td>)
- an image (<img>)
- Publish your HTML page on the internet, in your CSC account
- create the public_html dir
under your home directory
- in order for the public_html to be visible from outside, login
to CSC and execute the following command
fs setacl public_html system:anyuser rl
- copy the page you created at step 1 in public_html
- now test your page by loading the following URL in your browser
http://www.student.nada.kth.se/~yourUserName/yourPageName.html
Task 2
- To train on working with
Streams, which are important when working with internet connections,
make a small Java file copy program using a text editor. See the java
documentation.
The program should work like below. You need to put it in a
file called Copy.java, and use
argv[0] as source file name and argv[1] as destination file name.
java Copy sourceFilename destinationFilename
Before starting to copy, your program should print:
- today's date
- the name of the source and of the destination file
You should not assume that your files are text!
Do not copy over a java file, you might
lose your work!
To test your copy program, execute this
command (on Windows use "fc" or "comp" instead of "diff").
diff sourceFile destinationFile
If java complains that it can't find the class
"Copy" then add the present file catalouge to the
"CLASSPATH" by using the command
setenv CLASSPATH .:$CLASSPATH if you use tcsh and
export CLASSPATH=.:$CLASSPATH if you use bash as command shell
To the top of the page »
Labb 2
Sockets, threads, servers
Work alone or in groups no larger than 2 persons.
Task 1
Connect to a HTTP server and save the file locally.
Use
java.net.Socket or java.net.URLConnection
to read a file from a HTTP server and save it to the local directory.
If you call your class WebGet (and keep the code in WebGet.java),
you should invoke your program by either
java WebGet http://someserver/somefile
or
java WebGet serverName fileName
Note! saving the file in the local directory means that you
should remove all the path from the file name! e.g.
www.csc.kth.se/utbildning/kth/kurser/DD1335/index.html should be saved as
the local file
index.html
optional subtask
If the file already exists in the current directory
(test that using java.io.File), add a number
to its name (e.g. index.html.1, index.html.2 or index1.html, index2.html)
until you create a new file name.
Test your program by invoking Unix wget
module add hacks
wget http://someserver/somefile
wget will tell you under what name it saved the file.
Then use
diff to compare the file brought by
wget
with the file brought by your program.
Task 2
Threads: two simple identical threads
Every internet server (in task 3 there will be one)
needs to serve more requests at a time so it needs to
do more than one thing at a time. For that, Java Threads are used.
Run the thread example below (MyRunnable.java).
To construct a Thread you need to define a Runnable
(basically to define its run() method).
Then, to start the Thread, use its start() method.
public class MyRunnable implements Runnable {
   // you will add some more members here

   public void run(){
   // implementing run(), required by the Runnable interface
      while(true){
         System.out.println("this repeats");

         // do not block the CPU, sleep 2 seconds:
         try{
            Thread.currentThread().sleep(2000);
         }
	 catch(InterruptedException ie) {
            ie.printStackTrace();
         }
      }
   }

   public static void main(String[] argv){
      // you will use this twice:
      Runnable r= new MyRunnable();
      Thread t= new Thread(r);
      t.start();
   }
}
Stop the running program with Ctrl-c
Extend the code above to start two Threads,
one that prints "A" and the other that prints "B",
to see the mixed As and Bs printed independently
by the threads.
In
main(), make two threads (t1 and t2) from two Runnable objects (r1 and r2):
Runnable r1= new MyRunnable("A");
Runnable r2= new MyRunnable("B");
To see that the threads are really independent,
use (250 + (long) (Math.random() * 500)) as sleeping time.
Task 3
Reverse server
Based on the examples in the lecture slides, write a server that returns
the text you sent to it line by line, but reversed. So if you type a line "abc",
it should send back "cba".
The server should only assume that you send text
(i.e. you can use readers and writers). To start your server on a port
java ReverseServer port
To test your server, open a telnet connection and type lines into it.
You should see them returning to you reversed.
telnet localhost port
To the top of the page »
Labb 3
Forms and CGI
Complete this lab in groups of at most 2 persons.
Preparation
- Throughout this lab you will work in your CGI directory
/afs/nada.kth.se/public/www.student/cgi-bin/yourUserName
where youUserName should be replaced by your user name.
That directory is the proper place for all files you create for the lab
- If the directory doesn't exist, you do not have a NADA CGI account and you have
to ask for one from Delphi. If many of you don't have the account please
talk to Serafim.
Task 1
Create a simple HTML form containing the input elements below.
See some HTML examples and the HTML standard.
Use a text editor (not a graphic HTML editor) to edit it (e.g. emacs).
Save the form in a form.html file in your CGI directory.
The form ACTION should be javacgi.sh which you will write at Task 3.
Give the page a nice layout and write descriptive labels near each input element.
You can test your page by loading it in a web browser using File/Open
Input elements in your form
- A text field called "name" where the user should
type their name
- A textarea called "interests" where the user should type their
interests with 4 lines and 80 columns (use ROWS= and COLS= to set the
number of lines and columns respectively)
- Three chosers (SELECT... OPTION) where the user should enter their
birthdate, one called "day" (should show options 1-5), one called
"month" (January-April, option values from 1 to 4) and one called
"year" (1978-2008). They should only have one line (use SIZE= to
set the number of lines in the chooser)
- Two radio buttons, both called "gender", one with value
"female" and the other one with value "male".
The "female" radio button should be checked when you load
the page.
- A submit button
- A reset button
Test your form at
http://www.student.nada.kth.se/cgi-bin/yourUserName/form.html
Note:
http://www.student.nada.kth.se/cgi-bin/yourUserName/ without
a file name will not work! This is because directory listing from browsers is
forbidden in NADA's cgi-bin, for security reasons.
Task 2
Make a small CGI that replies to the form. Save it in javacgi.sh. Content is as follows (make sure there is no extra line at the top!):
#!/bin/sh
# This is a simple Unix shell script that
# runs the Java class MyCgiClass
# and passes the $QUERY_STRING enviroment
# variable as a Java "system property"
# which we call arbitrarily "query.string"
/usr/bin/java -Dquery.string=$QUERY_STRING MyCgiClass
If you made your script on Windows and uploaded it to Unix, you are likely to encouter problems (Internal Server Error) due to the different ways of handling newlines on the two operating systems. Try the following:
- make sure you use "ASCII" FTP transfer
- if at later steps (below) your script still fails to work, convert
newlines to Unix like this:
mv javacgi.sh javacgi.sh.bak; dos2unix javacgi.sh.bak > javacgi.sh
Give the script the necessary execution rights by running this command in your CGI directory:
chmod ugo+x javacgi.sh
Compile MyCgiClass (MyCgiClass.java) below. Look carefully at the code.
Don't forget to compile it whenever you change it during Task 3 and 4.
public class MyCgiClass{
  public static void main(String[] ignored){
    // The output of this program will be sent to the browser!
    // so we need to do the HTTP formalities, then we write HTML.
    // First we write the HTTP content-type, then an empty line.
    // After the empty line the browser knows that the HTML begins
    System.out.print("Content-Type: text/html\n\n");

    // Let's write some HTML
    String title= "My first CGI response";
    System.out.println("<HTML><HEAD><TITLE>"+title+");
    System.out.println(</TITLE></HEAD><BODY>");
    System.out.println("<H1>"+title+"</H1>");

    // Read the CGI query string as set by javacgi.sh
    String queryString= System.getProperty("query.string");

    // Print the query string in HTML, nicely preformatted
    System.out.println("<B><PRE>"+queryString+"</PRE></B><BR>");

    // Link back to the form.
    // Note the quote (") escaping as \" in String constants
    System.out.println("Back to <A HREF=\"form.html\">the form</A>");
    System.out.println("</BODY></HTML>");
  }
}
Task 3
Test your CGI
Test it in a Terminal window, by setting the QUERY_STRING by hand like this:
cd /afs/nada.kth.se/public/www.student/cgi-bin/yourUserName
setenv QUERY_STRING "month=1&day=2&year=1993&name=John&interests=none"
Now you can run the script as if it would be ran by the WWW server.
./javacgi.sh
When the script works, test it at
http://www.student.nada.kth.se/cgi-bin/yourUserName/form.html
Write stuff in the form and submit the form. See how the query string changes.
To check if there are errors, look at
http://cgi.student.nada.kth.se/cgi-bin/get-errlog
Note1:
this is not an efficient way to do CGI in Java,
because a Java Virtual Machine taking a huge space in system memory
(30 Mb) is started for each http access! You will notice that your
CGI access is pretty slow. The correct way to do CGI in Java is to
use servlets (Lab 4)
Note2:
you will notice that the query string has spaces
replaced by '+', newlines replaced with '%0D%0A', et.c.
Every query string needs to be decoded, you don't do that in this lab.
Servlets decode the query string for you.
Task 4
Change javacgi.sh and MyCgiClass.java to also print the CGI variable REMOTE_ADDR
Test in the Terminal first, then in the browser (see task 3).
cd /afs/nada.kth.se/public/www.student/cgi-bin/yourUserName
setenv QUERY_STRING "month=1&day=2&year=1993&name=John&interests=none"
setenv REMOTE_ADDR "some.host.on.the.net"
./javacgi.sh
Task 5
Change MyCgiClass.java to also print the "day" CGI parameter.
You have the parameter values in the query string so you will need to use some String methods to extract them as substrings:
- use queryString.indexOf("day=") to find out where the parameter begins
- use indexOf(stringToLookFor, fromIndex) to find out where the parameter ends
- once you know where the parameter value begins and ends, use substring(startIndex, int endIndex) to find the value of the parameter
.
Test in the Terminal first, then in the browser (see task 3).
To the top of the page »
Labb 4
Servlets and JSP
Complete this lab in groups of at most 2 persons.
Task 1: My first servlet (code provided)
Task 2: Printing out servlet request parameters and other request data
Task 3: A POST form submission (very easy)
Task 4: My first JSP
Task 5: Session exercise
Task 6: Connecting to a database (code provided)
Preparation
task 1 | task 2 | task 3 | task 4 | task 5 | task 6
APIs used and Documentation
We use Servlet 2.3 and JSP 1.2. Servlet API docs can be found here:
servlet package summary
and here:
servlet http package summary
and for JSP here:
JSP syntax reference
To use servlets, you need either a webserver with servlet support,
or a plugin to a web server. In this lab we use Apache Tomcat 5.0.
Tomcat can be ran standalone and then it does a webbserver job, or
it may be ran with a web server (e.g. Apache).
In this lab we use Tomcat standalone.
The servlet programming environment
The servlet programming evironment made for this lab has
become a generic CSC tool. Install it in your account
(or on your home machine or laptop) as follows
- Copy the localTomcat directory to your own home catalouge:
cp -r /info/DD1335/localTomcat .
- See to it that you use the older version of Java:
- Remove whatever java there is
module rm jdk
and disregard all error output.
- Then add an old java:
module add jdk/1.4.2
- make sure ant is accessible:
module add ant
Enter the localTomcat directory:
cd localTomcat
Now you are set to start using tomcat
- Initialize the tomcat environment;
ant install
- Compile all that need to be (re-)compiled:
ant compile
- Run tomcat:
ant tomcat
The 'ant install' command is used only at the start of every session.
In your directory there is a file called '.modules'. You can enter the module commands
above into that file so that it reads (at least, I disregard all commants in the beginning of the file - don't erase these comments):
module add jdk/1.4.2
module add ant
If you enter
module rm jdk just before the line
module add jdk/1.4.2 you will have removed all previously loaded java modules but you will get an error message at each login. It is not important but annoying.
When
ant compile and
ant tomcat work correctly you may start with your tasks.
Task 1
prep | task 2 | task 3 | task 4 | task 5 | task 6
1. Copy the form.html that you created in Lab 3 into your localTomcat/webapps/labbar
Change the form ACTION to servlet/MyFirstServlet
Put the following MyFirstServlet.java in localTomcat/webapps/labbar/WEB-INF/classes
(note the differences from MyCgiClass).
import java.io.*;
import javax.servlet.*;
import javax.servlet.http.*;

public class MyFirstServlet extends HttpServlet {
   public void service (HttpServletRequest req, HttpServletResponse resp)
   throws IOException, ServletException {
      ServletOutputStream out = resp.getOutputStream();

      // Throws IOException, which is already declared
      // in the throws section of this method
      String title= "My second CGI response, a Servlet!";

      out.println("<html><head><title>"+title+"</title></head><body>");

      out.println("<h1>"+title+"</h1>");

      // Read the CGI query string as set by javacgi.sh
      String queryString = req.getQueryString();

      // Print the query string in HTML, nicely preformatted
      out.println("<b><pre>"+queryString+"</pre></b><br>");

      // Link back to the form.
      // Note the quote (") escaping as \" in String constants
      // Since the servlet and the form have different
      // "virtual directories"
      // we need to refer to the form as ../form.html
      out.println("Back to <a href=\"../form.html\">the form</a>");
      out.println("</body></html>");
   }
}
Run
ant compile from
localTomcat in order to compile the new servlet.
      cd localTomcat
      ant compile
When your servlet compiles correctly, start tomcat
ant tomcat
Every time you change the servlet, load this page in another browser
(not necessary when using JSP!).
http://localhost:8080/manager/reload?path=/labbar
username: student, password: NADA
If tomcat won't stop/start, issue the
ps command in the terminal window
where you started it and kill the java processes there. Ask the lab assistant for help.
Test the form with the new servlet form response at
http://localhost:8080/labbar/form.html
Note:
you should see much better performance with servlets than in the case of Java CGIs
Task 2
prep | task 1 | task 3 | task 4 | task 5 | task 6
2. Change MyFirstServlet to print the CGI REMOTE_HOST or REMOTE_ADDR and the value of each CGI parameter (name, interests, day, month, year, gender) in a nice sentence. You can get them all by calling methods of the "req" object. To find which methods you need to call, look at the HttpServletRequest interface and its parent interface ServletRequest.
Task 3
prep | task 1 | task 2 | task 4 | task 5 | task 6
In form.html, change the FORM method to POST (FORM ACTION=... METHOD=POST)
and see how the URL changes when you submit. The servlet should continue to
work as before (which is not the case for the CGI you did at Lab 3).
Task 4
prep | task 1 | task 2 | task 3 | task 5 | task 6
Copy form.html into form.jsp and test it. It should work as before.
Replace the manual generation of the day, month and year choosers with "for"
loops in Java scriplets. Display 31 days and all 12 months.
Hint:
      <select name="day" size="1">
      <% for(int i=1; i<=31; i++)  {   %>
            <%--  print a day option instead of this comment --%>
      <% } %>
      </select>
To test if the HTML generated by JSP is what you wanted, look in your browser's menu for "View/Source" or "View/HTML Source".
Task 5
prep | task 1 | task 2 | task 3 | task 4 | task 6
Make MyFirstServlet store the the username in a session attribute.
If that session attribute is defined, form.jsp should not display
the username INPUT again, but just show the username value instead, by reading from the session.
To access the request (and then the session) from JSP, use the pre-defined variable request.
See HttpServletRequest to see how you can create and retrieve a HTTP session, and HttpSession methods. See the "session tracking" example in the servlets.pdf lecture.
Test this by submitting the form and going back to form.jsp. When you reload form.jsp, it should not show the username INPUT anymore.
Task 6
prep | task 1 | task 2 | task 3 | task 4 | task 5
A JSP that displays data retrieved from a Postgresql database
- First we need to make sure that the database driver that allows us to connect to the Postgresql server
on "nestor" is in our web application's WEB-INF/lib directory
(that's the servlet/JSP standard place for libraries, e.g. .jar files like below).
Execute the following command in one line:
cp /afs/nada.kth.se/info/DD1335/lib/postgresql.jdbc4.jar ~/localTomcat/webapps/labbar/WEB-INF/lib/
where you might have to substitute the tilde sign for whatever path you have chosen.
If you work at home, download the Postgresql drivers and save it in
localTomcat/webapps/labbar/WEB-INF/lib
This copies two jdbc drivers to your Tomcat library. One that ends jdbc3.jar and one that
ends jdbc4.jar. If you choose to use java 1.6 or higher then use the one ending with jdbc4.jar,
otherwise (java 1.4.2 up to java 1.5.*) use hte one ending jdbc3.jar
I haven't tried java 1.6 on this setting so there might be other stuff to change (Warning!).
- The database you will connect to has 6 tables
| Anställd |
(namn, lön, chef, avd) |
| Försäljning |
(avd, varunr, volym) |
| Leverantör |
(företag, adress) |
| Lager |
(företag, avd, varunr, volym) |
| Avdelning |
(avd, våning) |
| Vara |
(varunr, typ) |
Where the underlined column names make the key for the table
- Save the file dbTest.jsp in webapps/labbar/dbTest.jsp
by right clicking on the link and chose "save as / spara som" in the menu. Study it carefully.
<%@page session="false" %>
<%@page import="java.sql.*" %>
<% String username = request.getParameter("user");
   String password = request.getParameter("passwd"); %>
<!DOCTYPE html PUBLIC "-//W3C//DTD HTML 4.01//EN" "http://www.w3.org/TR/html4/strict.dtd">
<html lang="sv">
   <head>
      <meta http-equiv="Content-Type" content="text/html; charset=ISO-8859-1" >
      <title>Database Test</title>
</head>
<body>
<% if (password == null || username == null)  { %>
    In order to send the predefined query to the database you have to authenticate
    by sending your login name and password to the database manager.<br />
    <form action="dbTest.jsp" method="post">
	<table border="0" cellspacing="5" cellpadding="3">
        <tr><td>User name:</td><td><input type="text" name="user"></td></tr>
	<tr><td>Password: </td><td><input type="password" name="passwd"></td></tr>
	<tr><th colspan="2"><input type="submit" name="submit" value="Send"></td></tr>
        </table>

<% } else {
   Connection conn = null;
   // load the postgresql db driver
   try {
      Class.forName("org.postgresql.Driver");
   }
   catch (ClassNotFoundException cnf) { %>
     <h1>Could not find the JDBC driver</h1>
   <% }
   try{
      // connect to the database
      conn = DriverManager.getConnection(
        "jdbc:postgresql://nestor.nada.kth.se/varuhuset",
        username, password);
      // issue a query and read the results
      if (conn != null) {
         Statement st = conn.createStatement();
	 String query = "SELECT avd, våning FROM avdelning where våning in (2,3)";
         ResultSet result = st.executeQuery(query);
   %>
   <%-- First, inform the user about the query --%>
   <h2>The query:</h2>
   <p><%=query%></p>
   <h2>The database response to the query:</h2>
   <p>
   <%-- we open a table, each row in the database
           will be a row in the table --%>
   <table border="0"><tr><th>Avdelning</th><th>Våning</th></tr>
   <%
      // as long as we have results
      while(result.next()){
         // we write a table row in HTML
   %>
   <tr><td><%=result.getString(1)%></td><td><%=result.getInt(2)%></tr>
   <%
      // end of while()
      }
      %>
      <%-- end of table --%>
      </table>
      </p>
      <%
      // end of db connection
      result.close();
      st.close();
      conn.close();
      // end of "try {" above
      }
    }
    catch(SQLException e){
       out.println("<h3>"+ e.getMessage()+"</h3>");
    }
} %>
</body>
</html>
You can find the file on the filesystem as well. It is located in /info/gruint09/laborationer/dbTest.jsp
Observe that error handling is very primitive. Test it by entering a user name or password that is incorrect
What you should get from the database:
- a list of all departments on the second and third floor from a database for a department store
that is used for SQL training
Your task is to change the jsp page in order to print the names and department of people working in those departments
Observe that the page does not store any info about you in the session object for the page. It only sends
your user name and password to the same page, which is rewritten with new content.
To the top of the page »
Labb 5
"Client-side" internet programming
Complete this lab in groups of at most 2 persons.
XHTML + CSS
Same HTML content using different stylesheets in a
frameset
Client-side form validation with Javascript
Simple Applet, opening a URLConnection
chat server for the simple applet
Preparation
task 1 | task 2 | task 3 | task 4 | task 5
W3
schools
HTML reference
Note that a lot of client-side
internet programming can be learned from the pages you like on the
Internet by chosing "view source" in your browser. Applets, ActiveX,
etc are exceptions.
Task 1
Prep | task 2 | task 3 | task 4 | task 5
Create a XHTML
page that has the following:
- A cascading
style sheet defined externally with the following elements:
- h1 as green text, yellow background, extra large, Arial, italic
- A class representing centered paragraphs with light-green
background
- CSS
pseudo-classes that make all links in your document change size
when you move the mouse over them and must change color when you click
on them
- At least one example using each of the above
- Put the page on the net. XHTML
validation should pass
Task 2
Prep |
task 1 |
task 3 |
task 4 |
task 5
Write CSS where h1, paragraphs and links are
shown however you
like, load that in your document instead.
Make a separate xhtml file containing a
frameset
that shows the same XHTML content, only with different CSSs.
Add a link from one frame that opens a page in the other frame (
hint).
Task 3
Prep |
task 1 |
task 2 |
task 4 |
task 5
Make a FORM that has a TEXT input called
"sometext" which you
will use
Javascript
to
validate.
Your form must not be submitted unless all the conditions below are
fulfilled (the submission can go to a non-existent page):
- the first character of "sometext" is a digit (0..9)
- the length of "sometext" is equal to that digit
- It is
better to use Mozilla or a browser
that has a Javascript console (Mozilla has it in Tools/Web
development) in order to have some feedback about your Javascript
errors.
Task 4
Prep |
task 1 |
task 2 |
task 3 |
task 5
Simple applet. Take the simple graphical applet
from the lecture
public class
SimpleGraphicalApplet extends java.applet.Applet
implements java.awt.event.ActionListener
{
java.awt.TextField
input= new java.awt.TextField();
java.awt.TextArea
output= new java.awt.TextArea(3, 20);
/** arrange the two buttons nicely */
public SimpleGraphicalApplet(){
output.setEditable(false);
setLayout(new java.awt.BorderLayout());
add(input, "North");
add(output, "Center");
// we subscribe to listen to action events from the
input button
input.addActionListener(this);
}
/** Due to the addActionListener above, this method is called
when we press
Enter on the "input" text field */
public void actionPerformed(java.awt.event.ActionEvent
ignored){
output.setText(input.getText());
input.setText("");
}
}
- Put a HTML file that uses the applet (see the lecture) in your
CSC WWW account. Test the applet in a browser. Whenever you change
the applet,
compile it and reload the page. Just
reloading the page might fail to reload the applet! In the best
case,
Shift-Reload may work. If you use Java Plugin, press x in the Java
console (press h for other commands). In the worst case, you'll have to
restart the browser every time you compile. Maybe then it's better to
test it with appletviewer
YourFile.html but bear in mind that you will have to test it in
the browser in the end because e.g. security constraints (see URL
connection below) are not the same in appletviewer and in the browser.
- Make the applet do the same checks on the text entered is
entered on "input" (the first character should be a digit, the length
of the text should be the same as that digit indicates). If that's not
the case, print an error message in the "output" text area.
- Let the user type a URL to a HTML file in the input field and
print the HTML from that URL into the "output" text area. To accomplish
this, construct a java.net.URL
and then a java.net.URLConnection
out of it using openConnection().
Connect
the URLConnection, then getInputStream()
should give you a stream to the HTML content of the URL. To transform
that stream content to a String, use either the String(byte,int,int)
constructor, or a BufferredReader
from which you can get
text line by line. To construct a BufferedReader you will need to contruct
a reader from an input stream first.
If there is an exception while connecting to the URL or while
retrieving data from it, print the
exception's toString() in "output" instead. Optionally, you can also
print the exception's toStackTrace().
Note: due to the applet security
restrictions, you will only be able to see HTML coming from the WWW
server where the applet was loaded from (e.g. www.student). Otherwise
you should see an exception in the "output" text area. Test that!
Task 5
Prep |
task 1 |
task 2 |
task 3 |
task 4
Make the applet open a Socket.
Whatever is entered in "input" will be sent to the socket. Whatever
comes from the Socket will be added at the end (appended) to the
content of "output". Reading from the socket should be done in a
separate Thread. Test your applet by connecting to e.g. the echo port
of the WWW server where you store the applet (e.g. www.student)
Write a little
chat server for
the
applet. The server (see lab 2) should keep an array (e.g. Vector) of
all OutputStreams ("talk") to its clients. Whenever something
comes from a client (on the "listen" input stream) it should be sent to
all these outputstreams.
The server should detect if a client is not connected anymore (catch
exceptions when trying to read from or write to it) and delete its
OutputStream from the array so it doesn't try to send anything more to
that client.