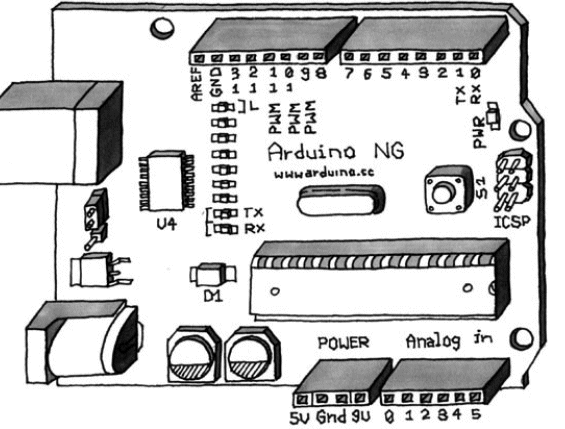
Arduino
- www.arduino.cc
- based on Wiring which is based on Processing
- cheap (22 EUR, can be found in e.g. Lawicell)
- open source
- you can build it yourself
- on some boards, you can change the microcontroller (ATmega8 or ATmega168)
- you can extend it upwards
- many types of boards
- including a wireless Arduino BT (Bluetooth), quite expensive.
- we have 3 Arduino NG (ATmega8),
and 1 Arduino Diecimila
(ATmega168)
and 5 Arduino Duemilanuove(also 168 but easier to power)
- see practical serial communication, FTDI circuit on-oboard
- ports > COM10 don't seem to work!
- gets power from the USB, you can change that with a jumper if you need to give it more current
- The Arduino Guide
- there are other sources of documentation even around the Arduino site. A bit messy.
Hardware layout

See the board guide
- schematic, nothing mysterious/unexpected
- The L led must blink at reset/power-up
- otherwise the board doesn't have a bootloader, so you can't program it
- connected to digital pin 13
- RX and TX LEDs blink during programming
- Just one serial port
- same as the programming serial port
- also used for debugging
- connected to pins 0 (RX) and 1 (TX) and to USB
Programming Arduino
- download the programming environment and see the environment guide
- reference
- tutorials
- how-to Windows, Mac
- if you can't get it to work, see troubleshooting
- in the Tools menu, check the Microcontroller and Serial port!
- programming practicalities
- on models before Diecimila need reset before programming
- you need to indicate in the environment the serial port you use
- program download takes longer time
- generated microcontroller object code is large in size
- (3 kB for a small program out of the 7kB available on the ATmega8)
- probably because the standard libraries are downloaded each time? sounds inefficient
- the Arduino language
- implemented in C
- procedural C syntax, similar to procedural Java syntax
- programs are called "sketches"
- Since most physical computing applications do a bit of setup then loop to check their sensors (polling), this is pre-programmed in Arduino
- like in any C program:
- you can define functions
- you can use #define for constants
- if(a=10) is legal and most often a programmer mistake (unlike in Java)
- for, while, switch, etc
- Libraries available
Debug
- just do serial output, Serial.println()
- but this means that you can't do both debugging and serial communication unless the other party is instructed to ignore
- the serial communication can be read with any other program, not just the Arduino environment. You can e.g. use the Windows Hyperterminal, or the Mac Terminal.
- just make sure you use the same baud rate in Serial.begin() and in your terminal program.
- in the environment you can set the baud rate from a chooser.
Digital output
- digitalWrite()
- the blinking LED
- pin 13 has a resistor and is connected to the L LED so digital output on pin 13 doesn't need a LED
- the LEDs we have can actually be used without resistors and they'll blink brighter
Digital input
- digitalRead()
- source
- one can e.g. connect a IR motion detector
- white to digital pin, red to power, black to ground
- 220 Ohm between white and red
Analog input
- analogRead()
- source
- variable resistor between power and pin, another resistor between pin and ground
- you can use any Phidget analog sensor!
- uses a analog-digital converter (ADC) built in the microcontroller
Analog output (PWM= Pulse Width Modulation)
- analogWrite()
- can only be done on pins 9, 10, 11. On Diecimila and Duemilanouve also on 3, 5, 6
- dimming LED
source
- simple LED connection from pin 11 to ground seems to work
Driving servos
Interrupt-based programming
- you can define digital events
on 2 pins (2 and 3) via interrupts
- not analog (give me an interrupt when value is under X)
- source example
- attachInterrupt(pin-2, function, mode)
- function is a function name (should actually be &fucntion = the address of the function in strict C language)
- mode can be LOW, CHANGE, RISING, FALLING
- if mode is LOW, interrupts keep comming as long as the pins stays on LOW voltage
- pin-2: pin 2 -> 0, pin 3->1. Only values 0 and 1 (pins 2 and 3) work for interrups
- detachInterrupt()
- still, there is no event queue like on Phidgets, no event details, no analog events, etc.
Other Arduino functions

