Wireless sensor networks
Wouldn't you like to not have wires between your controller and your sensors/actuators?
Wouldn't you like to program your installations without a serial/USB cable?
- at the Tekniska Museet we had an installation in the ceiling, we needed a crane every time we get there, plus we can't be alone (we can't operate the crane)
KTH expert: Gerald Q. Mguire Jr.
Issues
Power consumption
- Since you want no communication wires, you usually don't want power wires either
- In wire-full installations you usually transmit often, here it is preferred to transmit as little as possible to conserve power
- Gathering more data before a transmission, maybe transmit just an average or another type of aggregation
- Therefore a wireless sensor ("sensor node" in WSN parlance) is typically not just a sensor + radio, it also has some processing
- Typically nodes are autonomous
Communication
- Simplex/Duplex
- Unicast/Broadcast
Routing, Networking
- Some wireless sensors only transmit to a base station
- Others are also capable to receive, and transmit further (relay)
- Routing: information might travel from point A to point B indirectly, over a route
- Networking: at this level, the route between A and B is invisible, the programmer just knows that there will be a A-B connection and the system takes care of the rest
- So even more processing power is needed on the nodes
- Sink= the final recipient of a message (the end of the route)
Reconfigurability
- the sensor node is a complex beast, so you need to rearrange its capabilities
- OTAP= over the air programming
The SunSPOT
- Can be regarded as a high-level implementation of WSN
- Follows the Java Micro Edition standard (CLDC and MIDP)
- "Java on the metal"
- Besides forming a wireless sensor network with OTAP, they are also multithreaded like any Java program
Installation
- follow the very nice booklet that comes in the kit. Look also at the safety info!
- a SPOT will only work with the API version installed on it because the SPOT firmware depends on the API!
- Installing from the net will give you recent API versions, which may mean that you need to upgrade the SPOTs.
- NB: mark the version of the installed API on the SPOT kit!
- The installer is a Java app, so you have to make sure Java is correctly installed (JAVA_HOME, PATH)
- Installing the SPOT SDK also offers you to install NetBeans
- After, the ant build tool is installed. Ant is crucial to operate the SPOTs (ANT_HOME, PATH)
- being a USB device, the SPOT needs a USB driver
- other arrangements need to be made sometimes to ensure good serial communication over the USB (rx-tx)
- on Mac OSX Leopard and up to 10.7, these precautions were needed. They may be needed still.
- instead of sudo niutil... (as mentioned in the installation booklet) you have to run
- sudo dscl . -append /Groups/uucp GroupMembership username
- you might also need to download a fixed spotfinder , put it in the Sunspot installation home, in sdk/bin
The documentation in sdk/doc/*.pdf (links below are to the Orange = 2.0 version) or online
- owner's manual: nice quick overview of hardware and software
- theory of operation: detailed documentation,
- electric limitations (currents, battery life)
- states: run, idle, deep sleep
- deep sleep entered automatically when all threads are sleeping, lots of power can be saved!
- overall architecture
- developer guide (see below)
- if you installed NetBeans, a tab "SunSPOTs info" opens at startup, with useful links to Demos and other interesting possibilities
- emulator use (from 3.0 up)
Architecture
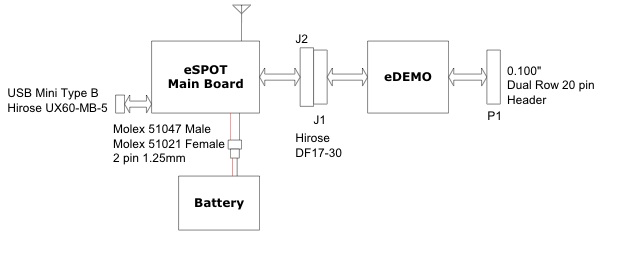
- The main board has an ARM processor
- The eDemo board has at Atmega88 microcontroller
Now connect to the SPOT
- Demos directory contains a number of applications, change dir to one of them
in a command terminal
- e.g. Demos/BounceDemo/BounceDemo-OnSPOT
- the example actually comes pre-programmed on SPOTs
- ant info should connect to the SPOT and tell you its current parameters
- notably the device IEEE MAC address which looks like 0014.4F01.0000.XXXX. The last 4 hexadecimal digits are written on the back of each SPOT
- you need the address every time you want to connect (from a program) to the SPOT or program it over the air (OTAP)
- ant deploy will compile the program from the curent folder and send it to the SPOT connected on the USB
- Sometimes the deployment is not successful and that makes the spot behave strangely, reset itself continously, etc
- to fix that, execute ant resetlibrary
- ant run will run the current program on the SPOT
- the two commands above are also available in NetBeans in the project context-sensitive menu
- in ant you can combine more commands (ant deploy run)
- ant upgrade updates the firmware or the little operating system on the SPOT
- to program Over The Air (or do any operation over the air) :
- make sure the remote (known as "free range") SPOT
- has the OTA command server started (i.e. is listening to OTA programming commands). You can see that with ant info, if it is not enabled, run ant enableota
- is well charged.
- connect a "base station" to the USB
- you can turn any SPOT into a basestation using ant selectbasestation disableota, then reset it
- ant -DremoteId=0014.4F01.0000.XXXX deploy run will connect to the designated SPOT and peform the operation (in this case deploy, then run)
- USB programming typically needs reset, OTA typically does not, which is great
We look at some demos
- The famous Bounce
- plus the Desktop version
- to run a Desktop version use ant host-run with a base-station connected to USB
- The telemetry demo (accelerometer)
- start on a SPOT first, then run the desktop version, with a base-station connected to USB
To make our own project
- start from a copy of an existing one
- modify resources/META-INF/manifest.mf
- change project name
- change main class name
- If you work with NetBeans, change also nbproject/project.xml
- Here is an example project, working with the Red API
Debugging
- System.out.print just like in usual Java
- It will show up in the output of ant run
- standard java debugging also available, through OTA
- any java debugger can connect, then do breakpoints, etc
- see owner's manual
The source for our examples is here. Put it in src/se/kth/csc/Lecture.java
EDemoBoard (the link to the official API is for the 2.0= Orange version)
- example program illustrates all aspects below, mostly one per thread
- simply un-comment threads (in the run() method) to see how they work
- Tricolor led control
- ITriColorLED leds[] = EDemoBoard.getInstance().getLEDs()
- leds[0].setOn() also leds[0].setColor(LEDColor.BLUE)
- in general you can use directly EDemoBoard methods, or retrieve I* objects (like ILed) and use their methods in turn
- dimming the tricolor LEDs :
- EDemoBoard.getInstance().setLEDColorIntensity(EDemoBoard.LED1, ITriColorLEDController.BLUE, 64);
- value goes from 0 to 255 so 64 is "quarter-on"
- reading on-board sensors
- ILightSensor lightSensor = EDemoBoard.getInstance().getLightSensor(); lightSensor.getValue()
- ITemperatureInput tempSensor = EDemoBoard.getInstance().getADCTemperature(); tempSensor.getCelsius()
- ISwitch sw1 = EDemoBoard.getInstance().getSwitches()[0]; sw1.isOpen()
- reading accelerometer
- I/O connector (top corresponds to the left of the SunSPOT), see theory of operation, search for "I/O connector"
-

- GND
- VDD: stable 3V for low-current digital work
- V+5V stable 5V
- SW1, SW2: buttons
- D0-D4: General Purpose Input/Output (GPIO)
- H0-H3: high-voltage, high-current output
- VH must be connected, conveniently placed near V+5V for simple applications but really intended for a separate source
- A0-A3: Analog-Digital converters
- digital out
- EDemoBoard.getInstance().setPinValue(EDemoBoard.H0, true);
- digital in
- analog in
- analog out (PWM)
- EDemoBoard.getInstance().setPWM(EDemoBoard.H0, 255);
- PWM input as well!
- interrupt instead of polling
- issues with deep sleep
- EDemoBoard.getInstance().enablePinChangeInterrupt(EDemoBoard.D0, true, true);
- PinDescriptor[ ]pdr= EDemoBoard.getInstance().waitForPinChange();
- since the device is muti-threaded, you can wait for different changes at the same time
- servo driving
- event-based programming
Coming up next: communication
- wireless communication between SPOTs
- communication between SPOT and Internet via base station (including http)
- serial communication between SPOT and other device via pins D1 (send) and D0 (receive)
More in the developer guide
- ant commands (e.g. traceroute)
- mode detailed device class list (I* classes)
- accessing system properties
- accessing SPOT flash memory
- communication over USB, serial, radio
SpotManager application
- java -jar SPOTManager.jar (or SPOTManager Java Web Start application)
- manages SPOTs and software versions
- there you can e.g. upgrade from current SDK version to higher versions